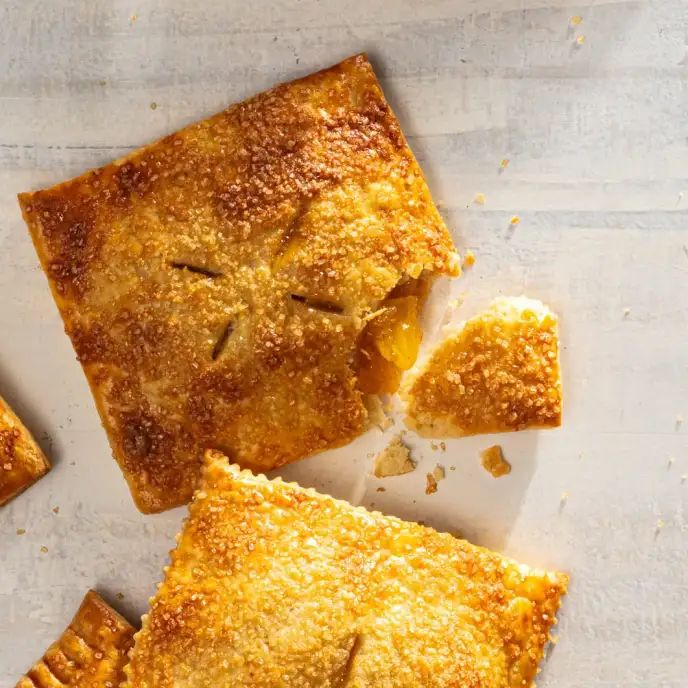
Peach Hand Pies
These hand pies landed like a revelation, and a great way to use up the glorious yield from my mother-in-law's two peach trees. Freeze some of the filling for summer delight when it's cold out! The work is well worth it. Oh, and making the crust is a great way to work out some aggression :P
Ingredients
For the pie crust:
- 2 1/2 cups (12 1/2 ounces) all-purpose flour
- 2 teaspoons granulated sugar
- 1 teaspoon plus 1 pinch table salt, divided
- 20 tablespoons (2 1/2 sticks) unsalted butter, halved lengthwise and chilled (fridge, not freezer)
- 3/4 cup ice water
- 1 large egg
- 1 recipe filling (see below)
- 2 tablespoons demerara or turbinado sugar (or more, I used more)
Peach Hand Pie Filling:
- 10 ounces frozen, sliced peaches, thawed, juices reserved, cut into approx 1/2” pieces
- 1/3 cup (2 1/3 oz) sugar
- 1/8 teaspoon table salt
- 1/4 teaspoon grated lemon zest
- 2 tablespoons lemon juice
- 4 teaspoons cornstarch
Equipment
- two half-sheet pans
- rolling pin
- bench scraper
Directions
For the crust:
- Place flour, granulated sugar and 1 teaspoon salt in a 1-gallon heavy duty ziploc. Seal and shake well to combine. Add butter to bag and shake to coat with flour mixture. Seal bag, pressing out as much air as possible.
- Set rolling pin over the lowest portion of the bag and, using rocking motion, flatten butter beneath pin into large flakes. Working in sections, move pin up bag and flatten remaining butter. Shake bag to mix. Roll over bag, shaking bag occasionally to mix, until flour becomes very pale yellow and almost all of butter is incorporated.
- Transfer mixture to a large bowl, using a spatula to scrape any remaining butter and flour mixture from the bag. Add ice water and toss with rubber spatula until just combined (mixture will be tacky).
- Transfer dough to a floured surface. With floured hands, press dough into a rough 8-inch square.
- Roll dough into a 15” x 10” rectangle, with the short side parallel to the edge of the counter, flouring dough and counter as needed. Starting at the top of the dough, fold into thirds like a business letter, using bench scraper to release dough from counter as needed.
- Turn dough 90° and repeat rolling and folding.
- Divide dough in half crosswise and wrap each half in plastic wrap. Refrigerate at least 1 hour and up to 2 days.
For the filling:
- Combine peaches and reserved juice, sugar and salt in medium saucepan. Using potato masher, crush one third of the fruit. Cook over medium heat, stirring occasionally, until sugar is dissolved, about 5 minutes.
- Stir lemon juice and cornstarch together in a small bowl until well combined. Add mixture to the saucepan and cook, stirring constantly, until mixture comes to a simmer and thickens, 30 to 60 seconds.
- Transfer to a bowl and refrigerate until fully cooled, about 1 1/2 hours. Stir in lemon zest.
To assemble:
- Adjust oven racks to upper-middle and lower-middle position and heat oven to 400 degrees. Line 2 rimmed half-sheet baking sheets with parchment paper.
- In a small bowl, beat the egg and the remaining pinch of salt until well combined.
- On a lightly floured counter, roll 1 piece of dough into a 17” x 9” rectangle with the short side parallel to the edge of the counter. Roll dough loosely around the pin, turn 90°, and arrange so long side is parallel to counter edge. If dough has contracted, re-roll briefly to the correct dimensions.
- Using a pastry brush, apply a 1-inch wide band of egg wash horizontally across the center of the dough, dividing it into the top half and bottom half. Apply a 1-inch wide strip of egg wash to the outer edges of the bottom half of the dough. Apply 1-inch wide band of egg wash vertically from the middle band to the bottom to divide the bottom half into 4 equal squares.
- Place 2 tablespoons filling in the center of each square, keeping the filling clear of the egg wash. Using spoon, shape filling into rough squares.
- Using a pizza cutter or sharp knife, cut dough at center points between filling, in the middle of the vertical egg wash bands, to create 4 separate long rectangular pieces of dough, each with filling on the bottom.
- Working with 1 piece at a time, gently fold the top half of the dough over the bottom half, aligning top and bottom edges. Use your fingers to gently press dough layers together, and work out as much air from the filling as possible. Trim 1/4 of dough from each edge, then seal edges by pressing with the tines of a fork in a nice decorative pattern along the entire circumference of the pie. Repeat with remaining 3 pies.
- Repeat steps 3 through 7 with the second piece of dough.
- Transfer hand pies to prepared rimmed baking sheet. Cut a 1-inch slit vent in the top of each hand pie. Transfer sheet to the refrigerator and chill for 15 minutes.
- Brush the tops of the pie with egg wash and sprinkle generously with demerara sugar.
- Bake until dark golden brown, 20 to 25 minutes, switching and rotating sheets halfway through baking.
- Let cool for 20 minutes, then serve warm.
Notes
- For the filling recipes CI actually calls for using frozen fruit - I used fresh peaches just ‘cause I had them.
- For Cherry filling: replace peaches with frozen cherries, omit the lemon zest and stir in 1/8 teaspoon almond extract at the end in its stead.
- For Pineapple filling: replace peaches with frozen pineapple chunks, replace the lemon juice with lime juice, omit lemon zest and replace with 1/4 teaspoon cinnamon at the end in its stead.
- OK, yeah it’s weird to roll the butter, but this is how you get the flat butter flakes that are the key to an extra flaky pie crust. It’s worth it I promise! Well, this and the envelope folding.
- Both the filling and the wrapped dough can be kept in the freezer long-term.
- From CI: At Step 9 of assembly, the pies can be frozen on the sheet until solid, about 4 hours. Transfer to an air-tight container and keep for up to 6 weeks. Transfer to parchment lined sheet and thaw at room temperature for 2 hours before baking. Or not - I think I thawed mine for like 20 minutes? They did fine :) It’s hard to wait when you want pie!
- Yes, you MUST let these cool before you eat them! Otherwise you will burn your mouth and tongue and then you can’t taste anything and you’ll be sad. Trust me.
Source: Cook's Illustrated No. 176 - May & June 2022